TTNC Softphone for Mobile User Guide
Guide for configuring and using the TTNC Softphone application
The TTNC Softphone is a feature-rich SIP client available for your mobile device.
Designed to be used with TTNC’s VoIP service, the TTNC Softphone App can be set up in seconds and comes packed with business class PBX features.
Used in conjunction with TTNC’s numbers and cloud communications services, the TTNC Softphone app enables you and your team to communicate more effectively and efficiently, from any location with an internet connection.
Softphone Features:
- Easy set up - QR code scanning for provisioning within myTTNC
- Call Recording and player (on your device) - record single calls or conference calls
- Supports making VoIP calls over 3G/4G/5G and WiFi
- Automatic creation of quick dial contacts (Extensions) for all other VoIP users on the realm
- Custom Ringtones (16 different tones)
- Phone Contact integration, add or edit contacts from within the app
- Push Notifications for incoming calls to save battery life
- Do Not Disturb - DND on device
- High-quality audio
- Echo cancellation
- Speakerphone, Mute and Hold
Call Handling Features:
- Call Transfer (Attended or Unattended)
- Busy Lamp Field (BLF) for user extensions
- Swap between 2 active calls
- Conference calls with Merge and Split
- Dial from Contacts, History and Favourites
- Quick Dial Extension numbers
- Call Hold with music
Downloading the TTNC Softphone App
The TTNC Softphone is a free application for Apple and Android devices which can be downloaded from:
iOS
|
Android
|


Provisioning the Softphone
There are two ways to provision your VoIP User onto the TTNC Softphone.
The most straightforward way to provision the Softphone is by scanning the QR code created by your VoIP User. The steps are slightly different depending on the type of phone you have - for [iOS] (doc:guides-for-ios#changing-your-voip-user-password) or Android.
The other way of provisioning is by manually entering the VoIP User information. - iOS or Android
App Overview
There are four main sections to the TTNC Softphone. These are:
1. History
Call history shows all the calls made from and received by the VoIP User, split by all, missed and recorded calls. Pressing Edit will allow you to delete individual rows or all entries.

Clicking on the i icon on the right of the call will display the details of the call. If there are multiple calls to/from the same number in quick succession they will be grouped together.
If the call was recorded you will be able to play back the recording from here.
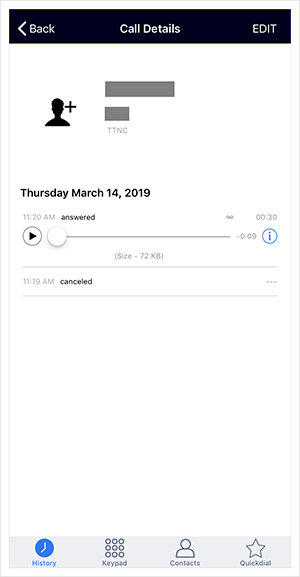
Clicking on the i next to the recording will allow you to send the recording via email (or Airdrop on iPhone) and also to lock the recording to prevent the file's deletion.

Clicking on Edit will allow you to delete a call from the history.

2. Keypad
This screen allows the user to enter a number to dial, clicking on the TTNC in the top left corner will allow you to toggle [Do Not Disturb] (doc:ttnc-softphone-user-guide#do-not-disturb).
The cog in the top right corner will take you into Settings and Preferences to make changes to the application and the manner in which calls are connected, rejected and accepted.

3. Contacts
When access to your mobiles contact list is granted your entire contact list will be displayed, allowing easy access to making calls.

4. Quickdial
When the VoIP User is initially provisioned other VoIP User associated with the same TTNC number will be displayed for easy, free of charge, internal calling.
The default view is a grid, this can be changed to a list.
- iPhone: the view can be changed by pulling the screen down.
- Android: the view can be changed by clicking on the three dots in the top right.
This screen also shows who is on a call in your team with the Busy Lamp Field feature.

4.1. Editing a Quickdial Contact
Pressing Edit in the top right corner allows you to edit existing Quickdial contacts and create new Quickdial contacts.
After clicking on an existing contact, you can edit the contact name, their extension/phone number or add an image. You can also disable the BLF notification for the contact.
If any changes are made click the Save button.
4.2. Adding a New Quickdial Contact
To add a new Quickdial contact, click on the + button and enter the details, or alternatively copy then from contacts using the 'headshot' icon.
The BLF will only work for contacts on the same realm as the VoIP User.

Making and Receiving Calls
Inbound Calls
Taking calls is as straightforward as receiving a call directly to your mobile.
When a call arrives, and the phone is awake the notification will show the following options:
- Accept - this will answer the call.
- Remind Me - this stops the app from ringing and will send a reminder to return the call.
- Reject - this will end the call.
If the phone is sleeping you will have the option of 'Slide to Answer' as well as 'Remind Me'
Outbound Calls
Making calls is very straightforward and can be done in a number of ways:
- Via the Keypad;
- From Call HIstory;
- From Contacts;
- Internal call from Quickdial.
Notification Messages - Battery Saver Mode
If you're using our Battery Saver Mode (to enable you to receive calls even if the app is closed) you will have to open the app at least once a month - to keep the registration active.
If you don't open the app you will receive the following notifications, all can be resolved by simply opening up the Softphone App.
Warning that the registration will expire soon (usually in one hour)

Warning that the registration will expire soon (usually in one hour)
The registration has expired - you can't receive calls.

The registration has expired - you can't receive calls
The app cannot receive calls.

The app cannot receive calls.
In-Call Screen
Once an inbound or outbound call has been answered, the In-Call Screen will be displayed. This screen offers a range of services and information.

1. Information
Pressing the i icon displays information about the call.
- The strength of the signal.
- The call state - if the call has been established, or if it has dropped.
- The network you are connected to.
- The codec being used.
- The account the call has been made to - will be TTNC.
- The jitter time - The delay in the sending of data packets over a network.
- The packet loss percentage.
- The round trip time - the length of time a packet takes to reach the destination.
2. Return to Last Screen
The back arrow below the Caller ID will take you to the last screen you were on.
3. Mute
The microphone icon in the centre will mute your call.
4. Speaker
The speaker icon on the right will put the call onto speakerphone.
5. Keypad
This will navigate to the keypad page.
6. Hold
This will place a caller on hold, or remove a caller from hold.
7. Record
This will begin / end call recording.
8. Transfer
This will allow you to blind (unattended) transfer a call to a number.
9. Add Call
This will allow you to bring a third person into the call by calling a second number and then joining the calls together.
10. Att. Transfer
This will allow you to attended transfer a call to a number.
11. End Call
This will terminate the call.
Call Holding
Pressing the hold button during an inbound or outbound call will place the call on hold, the person on the other end of the call will hear hold music for the time the call is on hold. Pressing the button a second time will take the call off hold.
Call Recording
All calls can be automatically recorded from the Preferences menu, however pressing the record button during a call will begin recording, pressing the button again will stop the recording.
Once the call has completed the call details and the recording will be available in the History.
Call Transfer
When you are on a call you can transfer that call to another number. This can be done one of two ways, via an Attended Transfer or an Unattended Transfer.
The number to transfer to can be selected from the Contacts, Quickdial or History screens alternatively a number can be entered on the Keypad screen.
Attended Call Transfer
An attended or warm transfer is one made by placing the caller on hold before speaking to the colleague that the call is being transferred to, then the two calls are merged, and the transfer occurs.
Unattended Call Transfer
An unattended or blind transfer is one made without speaking to the colleague the call is being transferred to.
Call Parking and Pick-Up
If, while you are on a call, a second call attempts to connect you will be faced with the standard mobile 'Accept / Reject Call' screen. Your options are:
- 'End & Accept' - This will end the current call and connect the new incoming call. - The In-Call screen will show the new incoming call.
- 'Decline' - This will reject the new call and keep the initial call active - If your TTNC number is set up to forward to another destination the call will change to the next destination. - The In-Call screen will show the initial call.
- 'Hold & Accept' - This will place the existing call on hold and connect the new incoming call. The In-Call screen will show the new incoming call.
To 'End & Accept' or 'Decline' will return you to the standard In-Call screen, If you 'Hold & Accept' you are presented with the below screen, initially the active call will be the new incoming call.

To swap calls press the grey swap button at the bottom of the screen, this would place the new call on hold and return you to the original.
You have the same options for both calls, you can transfer either of the calls (attended or unattended), you can record both calls and you can also create a conference call with the two calls.

Conference Calls
To create a conference call, you will need at least two connected calls, these can be inbound or outbound calls.
A single VoIP User has up to 3 available calls channels
Join
Once you have two calls connected to your TTNC Softphone, you will see a join button, press this and both calls will be linked together. The Caller ID bar at the top will show 'Call Group' and will display both numbers.
To add more participants, you can place the call on hold and dial another number, then once connected use the join button to add the new call to the conference call.

Split
When you are on a conference call, to unlink the calls without ending the call you can press the split button. This will split up the Call Group and will put the calls on hold. You can then take each call off hold speak to the callers individually.

Settings Screen
There are a number of settings which can be altered from the Settings screen, which is accessed from the Cog on the Keypad screen. The settings are:

Account Setup
This will show the account information of the registered VoIP user - the user can be deleted, and a new user entered if they're associated with the same TTNC phone number. If the user is associated with a different phone number press cancel then the Reset Application option at the bottom of the Settings screen should be used and the QR code of the new user is scanned when relaunching the app.
Transport ProtocolUDP is our preferred Transport Protocol as it's usually faster, simpler, and more efficient than TCP, however, in some scenarios, TCP may be the better Transport to use. This can be changed in the Account Setup.
Incoming Calls - Push Notification
Turning on Push Notifications allows you to receive calls while the phone is sleeping. If this is off then you are only notified of an incoming call if the Softphone app is open.
About
This will show information about the application and the version installed
Usage
The Usage screen shows the Talk Time and Call Count for This Month, Last Month and since the last reset.
SIP Log
When the 'Log SIP Traffic' option is selected in the Preferences Screen, SIP Log can be selected. From this screen you can clear the log, copy and share the log.
Reset
Pressing this option will wipe all of your settings and history allow a different user to register. Once confirmed the app will close. To re-register a VoIP User, reopen the app and either scan the QR code from myTTNC or follow the manual provisioning process.
When the VoIP User is updated in myTTNC, the softphone should be reset and reprovisioned using the QR Code on myTTNC
Preferences Screen
The Preferences screen, accessed from the Settings screen, allows you to alter the TTNC Softphone Application to your liking. By default, the application is set up for optimal use on the TTNC network, but all of these options can be changed without affecting your service.

Ringtones
The Ringtone can all be altered between 16 different tones. When you click on the rows the sound will play. Press the done button will change the tone.
Sound
Within the Sound option, you can alter the volumes of the microphone, the played audio and the keypad. You can also set the phone to automatically turn on the speakerphone when a call connects.
Call Recording
Calls can be recorded via the In-Call screen, however, you can enable recording for all calls, these are accessible via the History screen. Multichannel will record a separate file for each participant - this will use more space, by default these files are saved as 8kHz wav files, this can be changed to 16kHz wav files or 48kHz ogg files.
As standard, the files are kept forever, however, this can be changed to a week or up to 6 months. If you add an email address or an Upload URL the file will be transmitted when a call terminates.
Call Forwarding
By default, all calls can be answered on the TTNC Softphone for Mobile Application, if you wish to forward the VoIP call to a different number for a short time, you can enable Call Forwarding and enter the number you wish to forward to. You can also add a forwarding button to the incoming call screen.
Forwarding from your VoIP User may incur call charges.
Number Rewriting
This option would change a telephone number as you type it in. For instance to replace a 44 at the start of a number with a '0'. To set up a rule click on the + in the top right corner. You must then create a 'Condition Type', e.g. the number 'Starts With' '44' then create an action, e.g. 'Replace With' '0'
Network
This option allows you to restrict the network type that the TTNC Softphone for Mobile Application uses. By default, this is set to 'Any Network' you can specify 'Wi-Fi', 'Mobile Data' or 'VPN' only. You can also specify the SSID (Wi-Fi network name) that the app will use, and SSID which the app will not connect to.
If you set the network to Wi-Fi only and are attached to a disallowed network the call will be automatically rejected.
Controls
You can enable remote control support from this screen. With 'Headset Buttons' enabled a single click will accept the incoming call and puts an active call on hold, double-clicking rejects an incoming call or hangs up an active call.
You can also specify what to do if there is an incoming GSM call (a native mobile call), by default this will put the VoIP call on hold. This can be changed to 'Do Nothing' or 'Play Message'.
'Do Nothing' will allow you to end the VoIP call, or reject the GSM call.
'Play Message' will play a message to the VoIP call participant. The default message can be used or you have the option to record a message.
Do Not Disturb
Putting your Softphone in to Do Not Disturb mode will reject incoming calls. To set it up, press the + in the top left corner.
Then specify the time interval (clicking on the times will show a timeline which can be altered).
Once the time and day on which DND should apply are specified, press the save button and your rule will be shown.
You can set the Softphone to reject calls from specific contacts in your contact list or to reject all calls.
DND on iOSApple has changed the way that they handle push notifications which affect the way that DND works with the softphone. When DND is enabled, you will still be briefly notified of the call with a push notification, however, the phone will not play the ring tone and can not be answered.
To avoid this notification, you will need to enable the native iOS DND feature, which will block all notifications to the phone.
Contact Sort Order
This option can alter the way that the list of contacts on the Contact screen is displayed, by default the order is the same as your mobile device, however, this can be changed to sort by First Name or to sort by Last Name.
Log SIP Traffic
This will enable VoIP logging when troubleshooting with TTNC Support. When enabled the Settings screen has an extra option in the Troubleshooting section.
Language
This will change the language displayed in the app - by default, this is set to automatic, which pulls in the mobile device settings.
SSL Exceptions
This screen is currently not used.
Updated over 1 year ago