IP Based Authentication
The TTNC SIP Trunk service provides an IP connection between our network and your PBX over the Internet. The trunk gives your PBX access to the public switched telephone network (PSTN), allowing you to make and receive calls.
This guide focuses on SIP Trunks with IP Based Authentication. For User Based Authentication, see the User Based guide.
Adding a SIP Trunk to your account
You can buy a SIP Trunk through the store in myTTNC. Just follow these simple steps:
-
Log into myTTNC by going to www.myttnc.co.uk
-
Click on
Storein the left-hand menu.

- Click on
Services

4, Click Buy Now next to the SIP Trunk.

- Select the amount of channels you require (concurrent calls) and click
Add

- Follow the steps to proceed to the basket and place the order.
Once the payment has processed, you will be able to configure your SIP Trunk.
Configuring your SIP Trunk
You can create the configuration details for your SIP Trunks in myTTNC. Just follow these simple steps:
- Log into myTTNC by going to www.myttnc.co.uk
- Click on
VoIP Servicesin the left-hand menu.

- Click
SIP Trunksin the left-hand menu, then clickConfigure SIP Trunk

- Give the new SIP Trunk a name, choose the number to display on outbound calls, and select the number of channels.

-
Select IP Based Authentication (if you wish to use User Based Authentication, see the how-to guide for the set up process.)
-
Enter the external IP address of your equipment (PBX or IP phone) in order to connect to the TTNC network.
-
Tick the 'Enable UK Emergency Services Access' box if you wish to be able to dial the UK Emergency Services, you will need to supply a location address once the
Update detailsbutton is pressed. See more about Emergency Access here. -
Tick the "Enable Outbound Call Recording" box if you wish all outbound calls from this VoIP User to be recorded. These recordings will be stored in your Call Logs for 30 days, during that time they can be replayed or downloaded.
Please note, all recorded calls will have a surcharge of £0.02/min (2p).
- Click
Saveto create the SIP Trunk.

Your SIP Trunk with IP Based Authentication is now ready to use.
Managing SIP Channels
If you need to add, remove or reassign channels from your SIP Trunk, see our Managing SIP Channels section of the SIP Trunk guide.
Forwarding to your SIP Trunk
In order to receive a call via your SIP Trunk, you need to set it as the forwarding destination on your number. This can be done by following these steps:
- Log into myTTNC by going to www.myttnc.co.uk
- Click on
Phone Numbersin the left-hand menu.

- Click on the three dots to the right of the number, and select
Edit Forwarding

- If the number is not currently forwarding, you will need to click
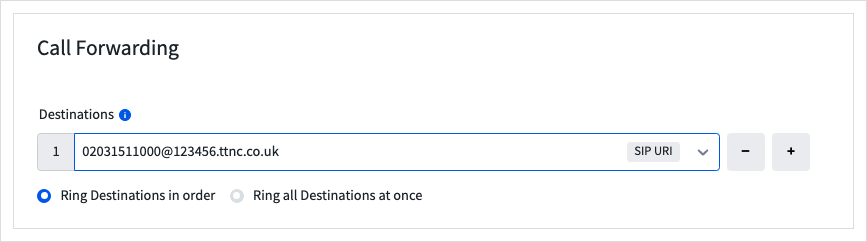
Call Forwarding - Click into the Destination field and type the SIP URI. In this example, we have used the phone number as the 'username' - Your 'username' will be determined by the format of your PBX and how the endpoints are constructed. See below for more information about SIP URIs.
- To save the settings, click
Apply

All calls will now be forwarded to your SIP Trunk.
SIP URIs
To configure call forwarding using a TTNC SIP Trunk, you must type in a SIP URI. These look similar to an email address. For example:
[email protected]– using username and domain[email protected]– using username and IP address
These are only examples to demonstrate URI formatting and will not work if set up in myTTNC.
Your SIP provider may not give you your destination in the form of a URI, but you should be able to create one from your SIP credentials;
- Username – this may be your account number/name, your 'inbound route' name, or your phone number.
- VoipHostDomain – this may be called the 'Domain', 'Host' or could be the inbound IP they provide.
Editing your SIP Trunk
You can edit SIP Trunks through myTTNC by following these steps:
- Log into myTTNC by going to www.myttnc.co.uk
- Click on
VoIP Servicesin the left-hand menu.

- Click
SIP Trunksin the left-hand menu, then click on the three dots next to the SIP Trunk you wish to amend. Click onEdit

- Make the changes to your SIP Trunk, then click
Save
Deleting your SIP Trunk
You can delete a SIP Trunks in myTTNC. Just follow these simple steps:
- Log into myTTNC by going to www.myttnc.co.uk
- Click on
VoIP Servicesin the left-hand menu.
- Click
SIP Trunksin the left-hand menu, then click on the three dots next to the SIP Trunk you wish to amend. Click onDelete
- Click
Deleteto remove the SIP Trunk.

Technical Information About Our VoIP Service
You can find more technical information about our VoIP service on the SIP Trunks page.
Settings for your IP Phone or PBX can be found here and if you have a firewall, you can find a list of IP addresses to allow through here.
Updated over 1 year ago