Desktop Softphone App - User Guide
Guide for configuring and using the TTNC Softphone application
The TTNC Desktop Softphone is a feature-rich SIP client available on your computer.
Designed to be used with TTNC’s VoIP service, the TTNC Desktop Softphone App can be set up in seconds and comes packed with business class PBX features.
Used in conjunction with TTNC’s numbers and cloud communications services, the TTNC Desktop Softphone app enables you and your team to communicate more effectively and efficiently from any location with an internet connection.
Softphone Features:
- Call Recording and playback from within the app - record single calls or conference calls
- Supports making VoIP calls over WiFi
- Automatic creation of quick-dial contacts (Extensions) for all other VoIP users on the realm
- Contacts - add or edit contacts from within the app
- High-quality audio
- Echo cancellation
Call Handling Features:
- Custom Ringtones (6 different tones)
- Call Transfer (Attended or Unattended)
- Busy Lamp Field (BLF) for user extensions
- Swap between 2 active calls
- Dial from Contacts, History and Favourites
- Quick Dial Extension numbers
- Mute Audio
- Hold with Music on Hold
- Do Not Disturb function
- 3-Way calling
Downloading the TTNC Desktop Softphone App
The TTNC Desktop Softphone is a free application for Mac and Windows which can be downloaded by clicking on the relevant icon below:
MacOS
|
Windows
|


Latest versions
Current Windows version: v1.12 - Build 1895019 CI 485, built on February 9th 2023
Current Mac version: v1.12 - Build 1895018 CI 622, built on February 9th 2023
Please ensure you're on the latest version if you're experiencing issues - you will need to download the latest version and re-install.
Provisioning the Softphone
To use the TTNC Desktop Softphone, you need to enter the TTNC VoIP User information manually. To find this information visit the Registering a VoIP user page.
When you have your VoIP User details, open the app and enter the information.
Username = VoIP Username @ VoIP Domain / Outbound Proxy
Password = VoIP Password
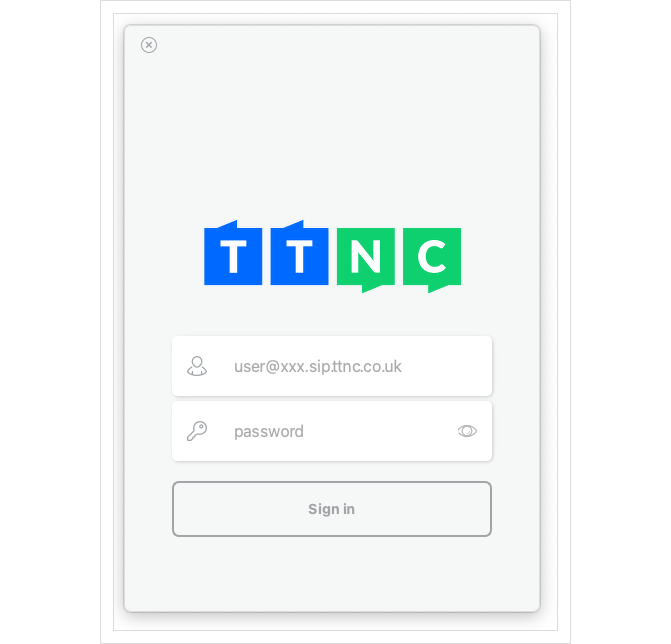
After clicking Sign in, you will then have to agree to the Terms and Conditions, then you can set the Desktop App to be the default calling app. Clicking Yes will give you instructions on how to make the TTNC app the default.

Once this is done, you can use the app to make and receive calls.
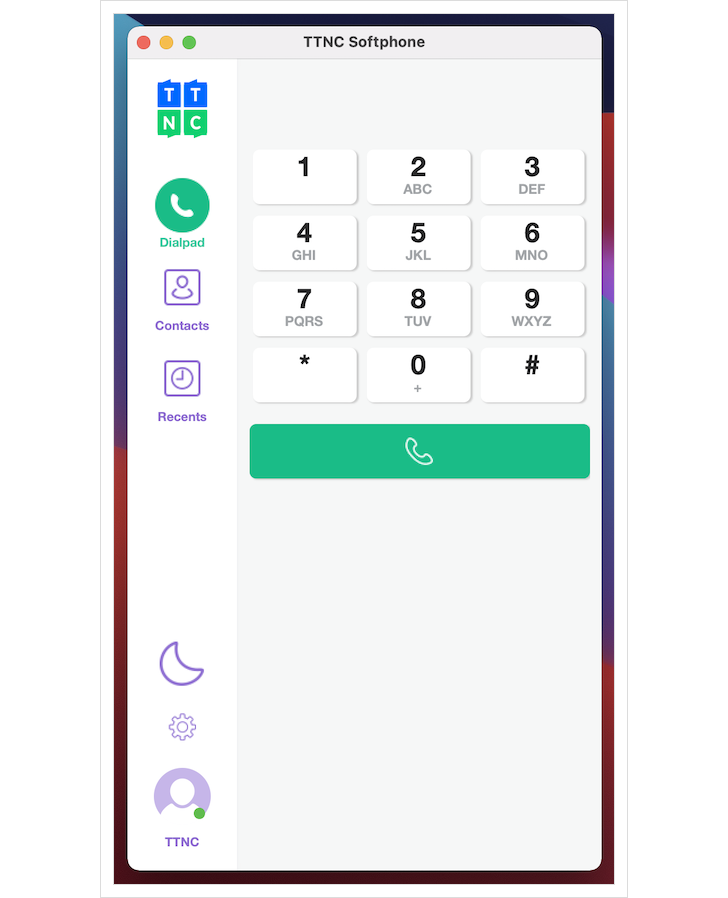
App Overview
There are three main screens on the App, which are the Dialpad, Contacts and Recents.
For ease of navigation, all screens have the same sidebar.
Below the TTNC logo you have:
- Dialpad - This will show the keypad if it's hidden.
- Contacts - This will show the Contacts section below the keypad (or at the top of the window if the keypad is hidden).
- Recents - This will show the Recent Calls section.
- DND - You can toggle Do Not Disturb on and off.
- Settings - Opens a pop-up window showing the app's customisable settings.
The lowest icon shows the registration status of your VoIP User. A green dot means it's registered and working, and a red dot means that the registration has failed.
Dialpad Screen
This screen allows the user to enter a number and make calls.
Contacts Screen
Opens below Dialpad - When a contact / quick dial is clicked, the information opens in an extended window giving all the details, including a green handset for making a call.
There are two views:
-
Quick Dial - Any other VoIP Users you have configured on the same number will automatically show here for internal calls. You can also add personal contacts to this list.
-
Address Book - This is currently only available on the Mac app and is your contact list from the native Mac Contacts app.
When you select a contact, their information will appear on the main screen to the right. Clicking on the green handset next to the number will initiate a call.

Recent Calls Screen
This displays all contacts and numbers for inbound and outbound calls that have taken place via the app.

Clicking on a name or number will open the extended window giving details of each call to and from the number.
In the bar at the top, you can see the number of the caller and their name if they're a contact, along with several buttons, from left to right, these are:
- Call - You can make a call to the number.
- Add Contact - You can add this number as a Quick Dial contact.
- History View - You can switch between viewing all calls, only inbound, only outbound, or all missed calls.
- Delete - This will delete all the call history for this number.
- Toggle Sidebar - This will hide or unhide the list of recent calls, as well as the Dialpad if it's enabled.

Making and Receiving Calls
Inbound Calls
You can only receive calls if you have the TTNC Desktop Softphone open and you are logged in with your TTNC VoIP User.
Taking calls is as straightforward as receiving a call onto your mobile.
When a call comes in, a pop up will appear, and the ringtone will play. You can accept the call with the green handset button or reject the call with the red button. There is also the option to turn off the ringtone if you want the call to ring out.

Outbound Calls
Making calls is very straightforward and can be done in three ways:
- Via the Dialpad;
- From Call History;
- From Contacts.
In-Call Screen
Once an inbound or outbound call has been answered, the In-Call Screen will be displayed. This screen offers a range of services and information.

The labelled buttons on the in-call screen are:
- Toggle Call Recording on/off.
- Minimises the Dialpad, giving a full app window view of the in-call screen.
- Allows in-call sound source update.
- Opens and enables the Dialpad, allowing number entry from your keyboard.
- Put your caller on Hold - will change to a Play button while on hold.
- Terminate the call.
- Mute your microphone.
- Add Call - Start a new call - to enable 3-way calling.
- Attended Transfer - This allows you to speak to a colleague before transferring the call.
- Blind Transfer - This will cold transfer the call to a colleague without speaking to them first.
- Show the Mini In-Call screen.
Call Recording
Pressing the record button during a call will begin recording. You'll see the icon turn red and will hear an audible beep. Pressing the button again will stop the recording.

Once the call has completed, the call details and the recording will be available to listen to on the Recents screen.

Call Holding
Pressing the pause button during an inbound or outbound call will place the call on hold. The person on the other end of the call will hear hold music while the call is on hold. Pressing the button a second time (which now is a play button) will take the call off hold.

Call Transfer
When you are on a call, you can transfer that call to another number. This can be done one of two ways, via an Attended Transfer (to speak to a colleague first) or a Blind Transfer (without speaking to the recipient).

The number to transfer to can be selected from the Contacts or Quickdial lists. Alternatively, a number can be typed into the Dialpad.
To do this, first, place your caller on hold, then click on the button for the type of transfer you would like.
Attended Transfer
If you are using Attended Transfer, you can dial the number (or select the contact) of a colleague, and once you've given them the information, you can press the Transfer button highlighted with the white border.
Blind Transfer
If you're using Blind Transfer, as soon as the call to the destination you're transferring to is initiated, the transfer occurs - If you wish to cancel the transfer, you can press the cancel button to restart your conversation with the caller.
Add Call
If you wish to bring a third person into the conversation click the Add Call button then enter the number you wish to call (you can also select the number from your contacts or recent).
Once the call connects you can merge the calls together.

When the calls merge, the app will show the participants and also that there is a conference call taking place.
If you wish to split the calls back out, you can click split, then choose which of the two calls to be enabled. The other call will be placed on hold. If you terminate a call with another call on hold, the second caller will be taken off hold automatically.

Mini In-Call Screen
Rather than taking up a large part of your screen while on a call, you can show the Mini In-Call Screen. This screen has fewer options than the bigger In-Call screen, but you can alter sound settings, mute your mic and terminate the call.
The crossed arrows in the top right corner will show the full In-Call Screen.

Do Not Disturb
If you aren't available to take calls you can enable Do Not Disturb, which will automatically reject all inbound calls. If you have a second destination or Voicemail set up the call forwarding will be attempted.
To enable Do Not Disturb, click on the icon, which looks like a moon, above the settings 'cog'.
The outlined icon, on the left, means Do Not Disturb is disabled and you can receive calls as you normally can.
The icon in a purple circle, on the right, shows that Do Not Disturb is enabled, and no calls will ring on the app.

Settings Screen
To access the settings, click on the cog icon in the left sidebar. This will display the Settings pop-up window.

About
This shows information about the application and the version installed.
Account
This shows details of the VoIP User registered to the app.
Transport ProtocolUDP is our preferred Transport Protocol as it's usually faster, simpler, and more efficient than TCP, however, in some scenarios, TCP may be the better Transport to use. This can be changed under the 'Account' settings menu.
Notifications
You can change your ringtone on this screen.
The Texttone option is currently unused.
Sound
This screen displays your available sound sources and volume settings.
-
Microphone - the source of the mic when on a call. You can change the volume of the mic using the slide.
-
Speaker - the source of the audio when on a call. You can also change the volume of the speaker here too.
-
Ringtone audio output - the source which will play the ringtone when an inbound call reaches the app - this can be a different source to the speaker, meaning that you can have a headset for your calls, but use the computer's speakers for the ringtone.
-
Keypad volume - change the volume of each key press on the keypad.
-
Incoming audio noise suppression - reduces background noise from your callers' audio.
-
Outgoing audio noise suppression - reduces background noise when you speak.
-
Echo cancellation - will filter out echo, on a number of preset values.
- Disabled - no echo cancellation setting.
- Quiet Headset - lowest echo cancellation setting.
- Headset - low echo cancellation setting.
- Loud headset or quiet speaker - moderate echo cancellation setting.
- Speaker - high echo cancellation setting.
- Loud speaker - highest echo cancellation setting.
-
Enable headsets integration - can help with interference when using a headset.
-
Enable EPOS integration - allows call actions to be performed on a Sennheiser headset.
-
Advanced sound settings
- Audio Fragmentation - If you're suffering from audio breakup during calls, you can adjust the latency, lower latency should help with audio issues, but you can select from a range of delays (in milliseconds).
Recording
You can enable Call Recording for all calls and set the length of time that the audio is kept.
Controls
You can enable the app to automatically launch when you start your computer. You can also set the app as the default app for calls.
Logs
This screen displays all activity on the VoIP User account. This can be downloaded as a .txt file and may be used by TTNC Support for troubleshooting.
Reset
You can reset the app to remove your VoIP User information. You will need to log into the app again to make and receive calls.
Click To Call
The TTNC Desktop Softphone allows you to click on any phone number on a website which has been set up as a 'tel:' link. The number will look similar to a normal hyperlink on a website.
This is our main website.

The Telephone number link looks like this:
<a href="tel:+442031511000">+442031511000</a>When a link is clicked, the TTNC Desktop Softphone will open and the number will be dialled. The first time this process is attempted the browser will ask for permission to open the TTNC Softphone. If access is denied the call cannot be made.
To select the TTNC Desktop Softphone as the default application for Click To Call, please follow the guides for your operating system here:
Default Application For Click To Call Links - macOS
Default Application For Click To Call Links - Windows
Updated over 1 year ago